Large-volume 3D laser scanners play an essential role in manufacturing large products (e.g., airplane wings), making measurements for large-scale construction (e.g., bridges), and other applications where very large structures must be measured in three dimensions.
At present, however, there is no comprehensive standard to judge how well the instruments perform.
As part of an effort by NIST’s Physical Measurement Laboratory to produce an international performance evaluation standard for these instruments, scientists at the Engineering Physics Division (EPD) designed and constructed a calibration facility to evaluate proposed tests in a draft ASTM International standard, which is being developed under the EPD’s leadership.
In May 2016, major manufacturers of 3D laser scanners from all over the world converged at NIST to put their scanners through the paces.
This laser scanner “runoff” was orchestrated by EPD’s Bala Muralikrishnan, Meghan Shilling, and Prem Rachakonda, with key assistance from Gerry Cheok of the Engineering Laboratory at NIST and Luc Cournoyer from the National Research Council (NRC) of Canada.
An invitation was sent to all leading manufacturers of 3D laser scanners to visit NIST and run the approximately 100 tests specified in the draft standard. Four of the manufacturers traveled to NIST (one each from Germany and France) to participate in the runoff. Another sent an instrument during the week for testing. Two other manufacturers who could not attend in May have expressed interest in visiting NIST soon to try out the tests.
These seven manufacturers represent about four-fifths of the entire market for large volume laser scanners. Additional participants included representatives from a company interested in entering the 3D scanner market and a company manufacturing precision spheres that are used as targets.
The draft standard specifying the test procedures was the product of three years of work by a standards committee led by Muralikrishnan that met biweekly.
"With large volume 3D laser scanners, you basically put them in the center of the room, and they sweep across the room, producing 3D point clouds," Muralikrishnan explains. “The only current standard for these types of instruments evaluates the instrument only along one axis. That standard was released in 2015.
“The standard released in 2015 was envisioned to be one of several standards. Thus, we decided that we should extend this so that it covers the entire volumetric space. We started work in the summer of 2013 to come up with test procedures that would evaluate the performance of these instruments over the work volume.”
“After three years, we had a document that was mostly complete," Muralikrishnan explains, "but we didn’t want to publish it until we could realize all of the test procedures. That’s what we did here at NIST this month.
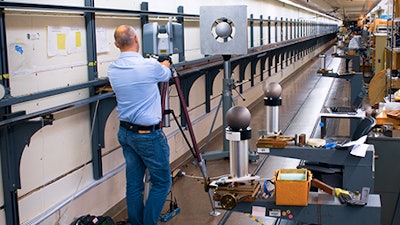
”The NIST team set up facilities to enable all the test procedures from the draft standard in the NIST dimensional metrology facilities, and participating manufacturers brought their instruments to NIST. There were three full days of testing across two NIST labs containing multiple experiments, each of which contained multiple tests. Often, two manufacturers were running tests on the same day with staggered times and locations. On average, it took each manufacturer an entire day to complete the full suite of tests. One set of tasks involved measuring point-to-point distances on a calibrated grid of spheres in the EPD's large-scale laboratory at NIST.
Once performance testing was completed, the manufacturers met with NIST and NRC staff to provide feedback on the process. While the manufacturer's overall experience was extremely positive, the clear consensus was that the number of tests needed to be reduced in order for the standard to become more practical to use. This will be a key consideration as the draft standard is revised.
Cournoyer elaborates: “We want the test to be useful, but we also want it to be feasible. It shouldn’t take a day. It should be done within a few hours at the most, without sacrificing too much of the performance evaluation. We think we can accommodate most of the concerns that the manufacturers were discussing. We will revise the document and discuss again.”
The standard needs to be practical for both end-users, who might not have access to ideal measurement facilities, as well as the manufacturers, while maintaining sensitivity to known error sources. And, in cases where the users do not have the necessary facilities to run the tests, there needs to be a way for manufacturers to generate an accurate set of specifications.
“If someone in an organization wants to know which scanner to buy, he or she will look at the specs," Cournoyer explains. "And the specs will mean the same thing because they were tested against the same type of standards and the same type of objects. Today, that’s not the case at all.”
Thanks to the NIST run-off, users are an important step closer to having these comparable specifications available. The willing participation of the world’s major manufacturers of 3D scanners in this effort, at their own expense, indicates the importance of performance evaluation standards in the buying and selling of manufacturing technology.
Along with the important next step of revising the draft standard, the NIST scientists will be spending many hours perusing the vast quantity of data acquired during the runoff.
"Now that we’ve had the opportunity to test all of the instruments and get data from all of the instruments, we can now analyze all of the data and see what type of algorithms make sense,” Muralikrishnan explains. “That is something that was not possible before this runoff. By having the manufacturers bring their instruments here and scan them in our facility with us controlling how they collected the data, we have the chance to do that now.”
NIST's role in orchestrating the runoff, acquiring these important data, and completing the standard is critical according to Cournoyer: “None of this would’ve happened without the NIST installation, the NIST people, and the NIST desire to complete the standard.”

